Polarizing microscopy involves the use of polarized light to study the optical properties of various samples. Although initially used primarily in the field of geology, it has recently become more widely used in medicine and biological research as well.
Polarizing microscopy is a contrast-enhancing technique that allows you to assess the composition and three-dimensional structure of anisotropic samples. It uses polarizing filters to exploit polarized light, configuring the motion of the light waves and forcing them to vibrate in a single direction.
A polarizing microscope is a microscope that inserts a polarizer and an analyzer into the optical system of an optical microscope to check the anisotropy and birefringence of a sample. Both the polarizer and the analyzer are made of polarizing prisms or Nicol prisms of polarizing plates.
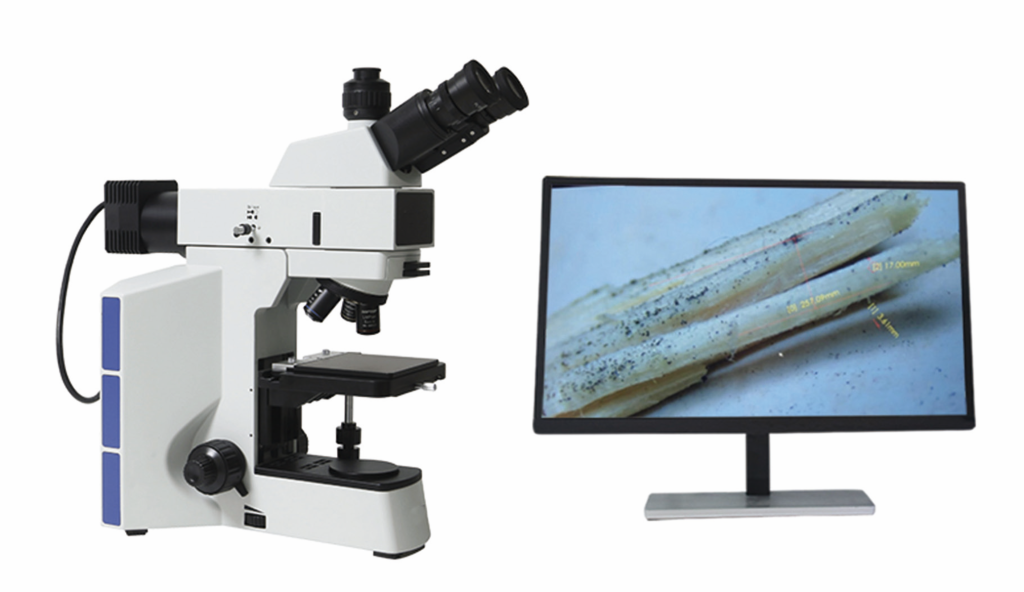
The former is installed between the light source and the sample, and the latter is installed between the objective lens and the eyepiece or on the eyepiece. In biological samples, muscle fibers, bones and teeth have anisotropy, and starch grains, chromosomes and spindles have birefringence, so they are used in the chemical research of tissue cells.
The light source is preferably single-wavelength light. Since the birefringence of biological samples is significantly weaker than that of metals, rocks or crystals, their interference colors are sometimes used by the addition and subtraction phenomena caused by sensitive analyzers.
Polarized light microscopy is usually used to detect the existence of certain ordered structures, mirror bodies and their refractive optical properties in organisms, and it can also be used to detect chemical components in certain tissues.
What is Polarized Light?
Conventional light microscopy uses unpolarized white light. This is the type of light we see, its waves vibrating in random directions. However, the waves of polarized light vibrate in only one direction, which we normally cannot see.
This type of light is used in polarized light microscopy to improve image quality when examining birefringent (birefringent), anisotropic materials. Anisotropic substances are “direction dependent” — that is, they don’t behave the same way in all directions. One such example is wood, which breaks more easily along the grain than against the grain. Steel, on the other hand, is isotropic and behaves the same in all directions.
How does this translate into optical terms? In general, most liquids and gases are isotropic and have the same optical properties in all directions: that is, they have one index of refraction. In contrast, most solid materials are anisotropic. Their optical properties vary depending on the direction of incident light (light falling on a surface), and they have a variety of refractive indices.
Key Components of Polarizing Microscopes
Although you can buy polarizing microscopes off-the-shelf, many scientists simply modify conventional light microscopes in order to use them for cross-polarized light inspection (polarizer and analyzer polarization directions separated by 90 degrees to create extinction: that is, when the field of view becomes as dark as possible). In general, a polarizing microscope requires two more:

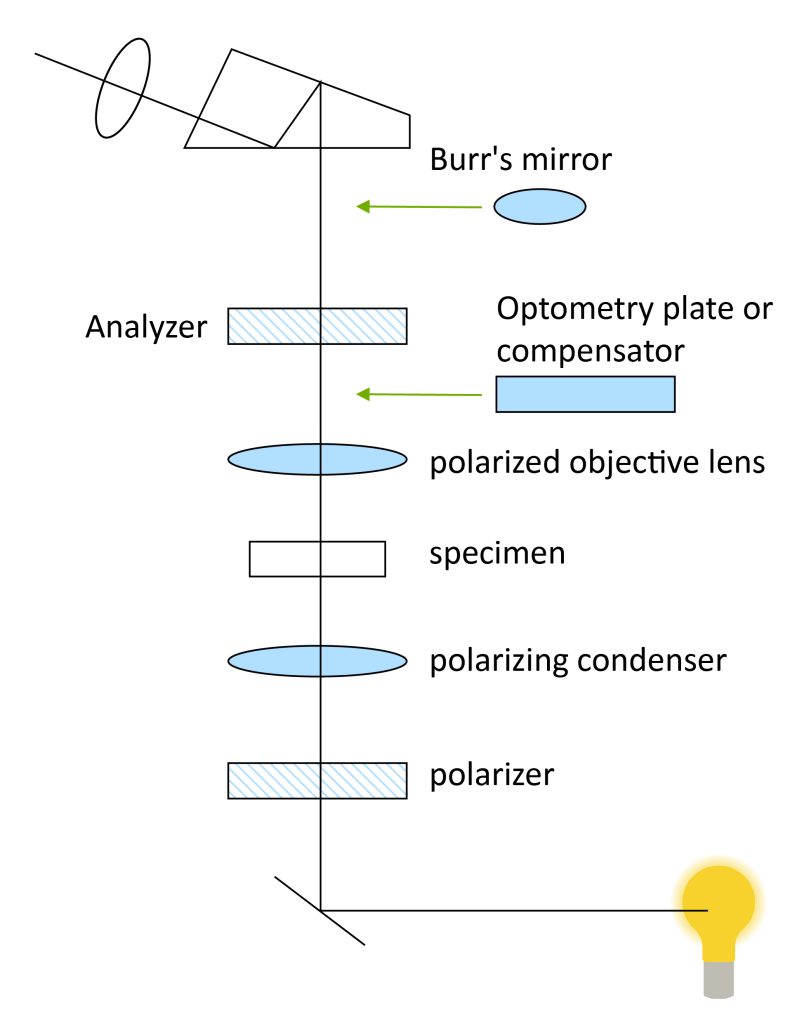
Polarizer: This filter can be manually rotated and placed somewhere in the optical path below the specimen, usually under the stage. It is aligned horizontally (east-west) and consists of particles aligned in one direction only. Therefore, it only allows light waves vibrating along its polarization axis to pass through completely, while absorbing light waves moving in other directions.
Analyzer: This is another polarizer that is vertically aligned (north-south position) between the objective and the eyepiece. Most student microscopes have an analyzer fixed in place, usually mounted above the stage. This makes cross-polarizer alignment (where the polarization directions of the polarizer and analyzer are 90 degrees apart) easier to achieve. However, depending on the microscope, you can rotate the polarizer as needed, or push it in or out of the light path.
Other special components of polarizing microscopes are described below:
1. Rotary table: it can rotate the sample 360 degrees.
2. Adjustable center converter: adjust the optical axis of the objective lens.
3. Compensator: used for delay measurement.
4. Optometry plate: used to find the diagonal position of the sample subtraction.
5. Burr’s mirror: used for colonoscopic light detection
How does a polarizing microscope work?
Light waves are omnidirectional and vibrate at angles perpendicular to the direction the beam travels. So when you turn on the microscope’s light source, the light travels up and gets polarized by the polarizer to go in one direction. This causes all passing light to be blocked, except for those waves that vibrate parallel to their preferred (light passing) direction.
The light waves then pass through the sample and vibrate in an east-west direction. If the analyzer is not in use, they will continue upward undisturbed.
When the analyzer is pushed in, only light moving in a north-south direction passes through. A second polarizer (in this case the analyzer) is placed in the light path, rotated 90 degrees from the axis of the first polarizer, which will subsequently block all light. Since all light is already polarized and can only travel east-west, no light can get through. The polarizers are now “crossed” and the viewer sees only darkness.
Applications of Polarizing Microscopes in Different Fields
The polarizing microscope is an instrument that uses the polarization characteristics of light to study and identify birefringent substances. It can be used for single-polarized light observation, orthogonal polarized light observation, and colonoscopic light observation. The polarizing microscope is equipped with accessories such as plaster λ, mica λ/4 test piece, quartz wedge, reticle eyepiece, and moving ruler. The important components are polarizers—polarizers and analyzers. A method of changing ordinary light into polarized light for microscope inspection to identify whether a substance is a single refraction (isotropic) or birefringence (anisotropy). Because this feature can be applied in many fields.
1. Biological field:
In biology, many structures have birefringence, which needs to be distinguished by a polarizing microscope. Different fibrin structures show obvious anisotropy, and the details of molecular arrangement in these fibers can be obtained by using a polarizing microscope. Such as collagen, spinning silk during cell division, etc.
2. Identification of various biological and non-biological materials:
Such as starch property identification, drug composition identification, fiber, liquid crystal, DNA crystal, etc.
3. Geological and mineral analysis:
Birefringence is a basic feature of crystals, so polarizing microscopes are widely used in the fields of minerals and chemistry, such as the analysis of minerals and crystals.
4. Medical analysis:
For stones, uric acid crystal detection, arthritis, etc., polarized light microscopy is often used to identify bones, teeth, cholesterol, nerve fibers, tumor cells, striated muscle, and hair.
5. The field of botany:
Such as identifying whether fibers, chromosomes, spun filaments, starch grains, cell walls, cytoplasm and tissues contain crystals.
How to Examine a Sample Using a Polarizing Microscope
(1) Check before use.
(2) The microscope should be used fixedly on the seat, which is not conducive to changing and moving the microscope at will. When moving and placing the microscope, the movement should be light and vibration should be strictly avoided, so as not to damage the optical system. When moving the microscope, you must hold the mirror arm and support the mirror base.
(3) All lenses of the microscope have been checked and cannot be disassembled by themselves. The lens must be kept clean. If there is dust, use a brush or lens paper to gently remove the dust. Do not wipe it with your hands or other objects to prevent damage to the lens.
(4) Microscope lenses and other accessories must be placed in the original accessory box and placed in a fixed position to prevent falling to the ground, and the accessories should be returned to the original place after use.
(5) Do not disassemble the microscope by yourself, or replace the accessories for use.
(6) When the slice is placed on the object stage, the cover glass of the slice must face up, and the slice is clamped with a spring clip.
(7) When using a high-power objective lens to focus, you need to watch with your eyes. Do not observe with your eyes in the eyepiece, so as not to cause the flakes to be crushed and damage the objective lens.
(8) When replacing the objective lens, be sure to hold the objective lens turntable to rotate it by hand, and do not directly hold the objective lens to rotate it by hand, so as not to rotate the objective lens.
(9) When using the upper polarizer and Bertrand mirror, do not push it violently to avoid shock damage.
(10) When the instrument is damaged or the adjustment fails, do not twist it forcefully.
(11) After the microscope is used, it is necessary to push the upper polarizer and Bertrand lens in, turn the coarse hand wheel to lift the objective lens, leave an eyepiece on the lens barrel, turn off the power, and cover the instrument cover.