- (1) Dark field microscope
- (2) Stereo microscope
- (3) Fluorescence microscope
- (4) Phase contrast microscope
- (5) Inverted microscope
- (6) Polarizing microscope
§1 Darkfield microscope
The dark field microscope does not have the function of observing the fine structure inside the object, but it can distinguish the existence and movement of particles above 0.004μm. Therefore, it is often used to observe the structure of living cells and the movement of intracellular particles.
The basic principle of dark field microscopy is the Tyndall effect. When a beam of light shines through a dark room, a bright dust “pathway” can be observed in the air from the direction perpendicular to the incident light. This phenomenon is the Tyndall effect.
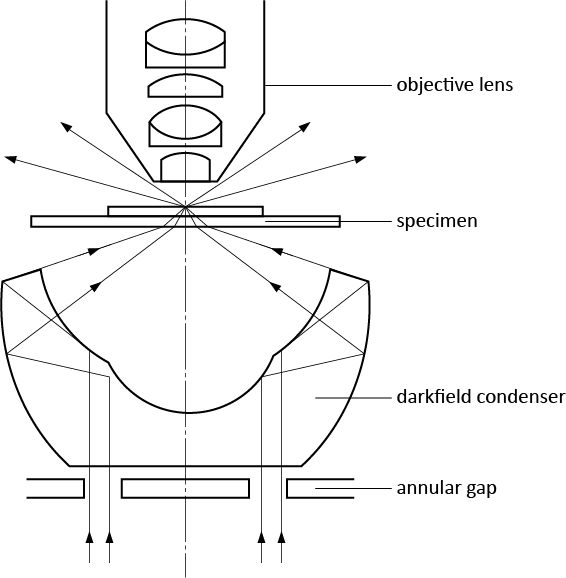
After a dark-field microscope is replaced with a dark-field condenser on an ordinary optical microscope, due to the obstruction of the internal parabolic structure of the condenser, the light irradiating on the surface of the object to be inspected cannot directly enter the objective lens and eyepiece. Only scattered light can pass through, so the field of view is is dark. What the operator observes through the eyepiece is the diffracted light image of the object under inspection (Figure 1-2).
The basic methods of using dark field microscopy are as follows:
- Install a dark field condenser (or use a thick piece of black paper to make a light shield and place it under the condenser of an ordinary microscope to get the dark field effect).
- Use a strong light source, usually a microscope lamp, to prevent direct light from entering the objective lens.
- Add a drop of cedar oil between the condenser and the glass slide to prevent the illumination light from being completely reflected on the condenser and not reaching the object being inspected, resulting in dark field illumination.
- Perform center adjustment, that is, move the condenser horizontally so that the optical axis of the condenser and the optical axis of the microscope are strictly in line. Raise and lower the condenser, and aim the focus of the condenser (the vertex of the cone beam in Figure 1-2) at the object to be inspected.
- Select the objective lens corresponding to the condenser, adjust the focal length, and operate as an ordinary microscope.
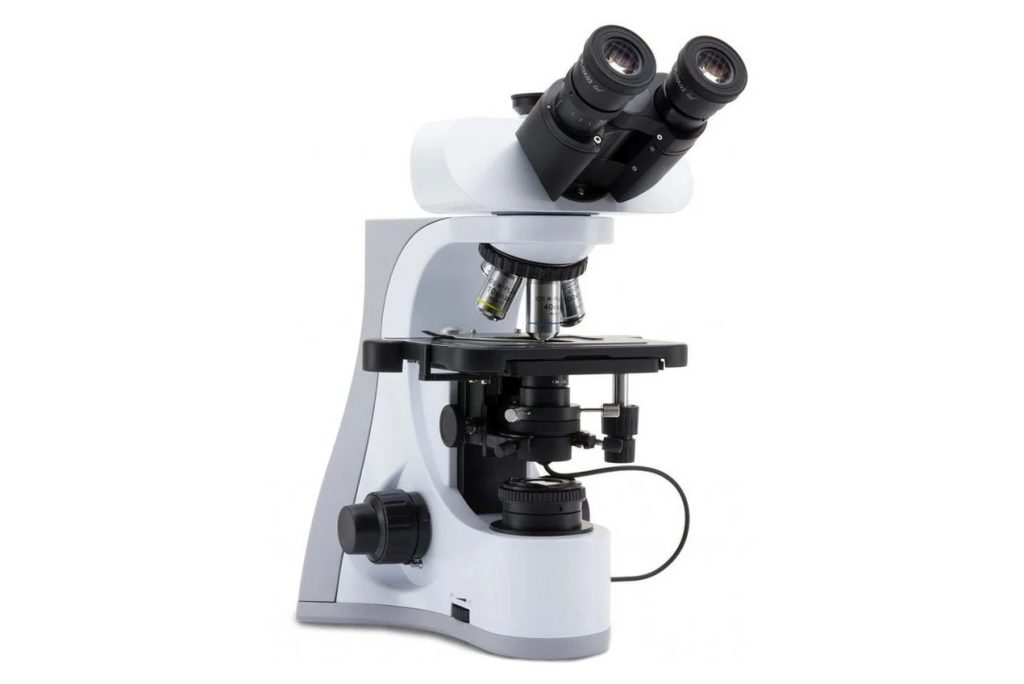
§2 Stereo microscope
The stereo microscope is also called a solid microscope or dissecting microscope. Its image is an upright three-dimensional spatial image and has the characteristics of strong three-dimensional sense, clear and wide image, the long working distance (usually 110 mm), and continuous magnification viewing. In biology, it is often used for real-time observation during anatomy (Figure 1-3).

The light source of an ordinary optical microscope is parallel light, thus forming a two-dimensional plane image; while a stereo microscope uses a dual-channel light path, and the left and right beams in the binocular tube have a certain angle of viewing angle (usually 12o15o), so it can Form a three-dimensional image of the three-dimensional space.
The main differences between stereo microscopes and ordinary optical microscopes are:
- The object of stereomicroscope examination does not need to be made into a mounting film.
- The stereo microscope stage is directly fixed on the mirror base and is equipped with a black and white double panel or a glass plate. The operator can choose according to the object and requirements of the microscope.
- The imaging of the stereo microscope is upright, which is convenient for anatomical operations.
- The stereo microscope has only one objective lens, and its magnification can be continuously adjusted by rotating the adjustment screw.
§3 Fluorescence microscope
Fluorescence microscopy is an optical tool that uses the fluorescence intensity emitted by intracellular substances to conduct qualitative and quantitative studies.
There are two types of fluorescent substances in cells. One type can fluoresce directly after being irradiated with ultraviolet light, such as chlorophyll. There are also some substances that do not have this property themselves, but if they are stained with specific fluorescent dyes or fluorescent antibodies, they will fluoresce after being exposed to ultraviolet light. It can also fluoresce after irradiation (Figure 1-4).
The principle of fluorescence microscope is to use a high luminous efficiency point light source (such as ultra-high pressure mercury lamp) to emit light of a certain wavelength (such as ultraviolet light 3650λ or violet-blue light 4200λ) through a color filter system as excitation light to excite fluorescent substances in the specimen. After the fluorescence of various colors is emitted, it is filtered by the blocking (or suppressing) filter behind the objective lens, and finally observed through the magnification of the eyepiece.
The blocking filter has two functions:
- One is to absorb and block the excitation light from entering the eyepiece to avoid interfering with fluorescence and damaging the eyes;
- The second is to select and allow specific fluorescence to pass through to show a specific fluorescent color.
Fluorescence microscopes can be divided into two types according to the principle of light path:
(1). Transmission fluorescence microscopy
In older fluorescence microscopes, the excitation light source passes through the specimen material through a condenser to excite fluorescence. The advantage is that the fluorescence is strong at low magnification, but the disadvantage is that the fluorescence weakens as the magnification increases. So it is only suitable for observing larger specimen materials.
(2). Epifluorescence microscopy
The excitation light falls downward from the objective lens onto the specimen surface, that is, the same objective lens is used as the illumination condenser and the objective lens for collecting fluorescence (Figure 1-5).
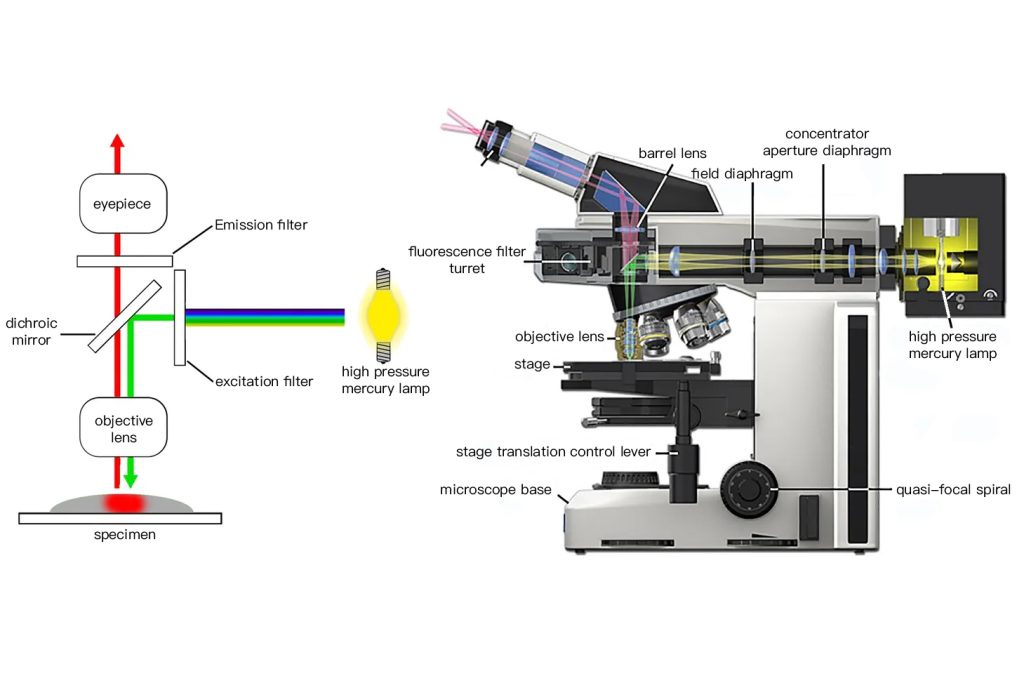
A dichroic beam splitter (dichroic mirror) needs to be added to the optical path, which is at an angle of 45° to the optical axis. The excitation light is reflected into the objective lens and concentrated on the sample. The fluorescence generated by the sample is reflected by the surface of the objective lens and the cover. The excitation light reflected on the surface of the glass slide enters the objective lens at the same time and returns to the dichroic beam splitter to separate the excitation light and fluorescence. The remaining excitation light is then absorbed by the blocking filter. If you use different excitation filter/dual-color beam splitter/blocking filter combination inserts, you can meet the needs of different fluorescence reaction products.
The advantage of this kind of fluorescence microscope is that the field of view is uniformly illuminated, the image is clear, and the greater the magnification, the stronger the fluorescence.
§4 Phase contrast microscope
A phase contrast microscope is a microscope that can convert the phase difference (or optical path difference) generated when light passes through an object into a change in amplitude (light intensity). It is mainly used to observe living cells, unstained tissue sections or stained specimens that lack contrast.
The human eye can only identify changes in the wavelength (color) and amplitude of visible light, but cannot identify changes in phase. Most biological specimens are highly transparent, and the amplitude of the light wave basically remains unchanged after passing through it, and only the phase changes.
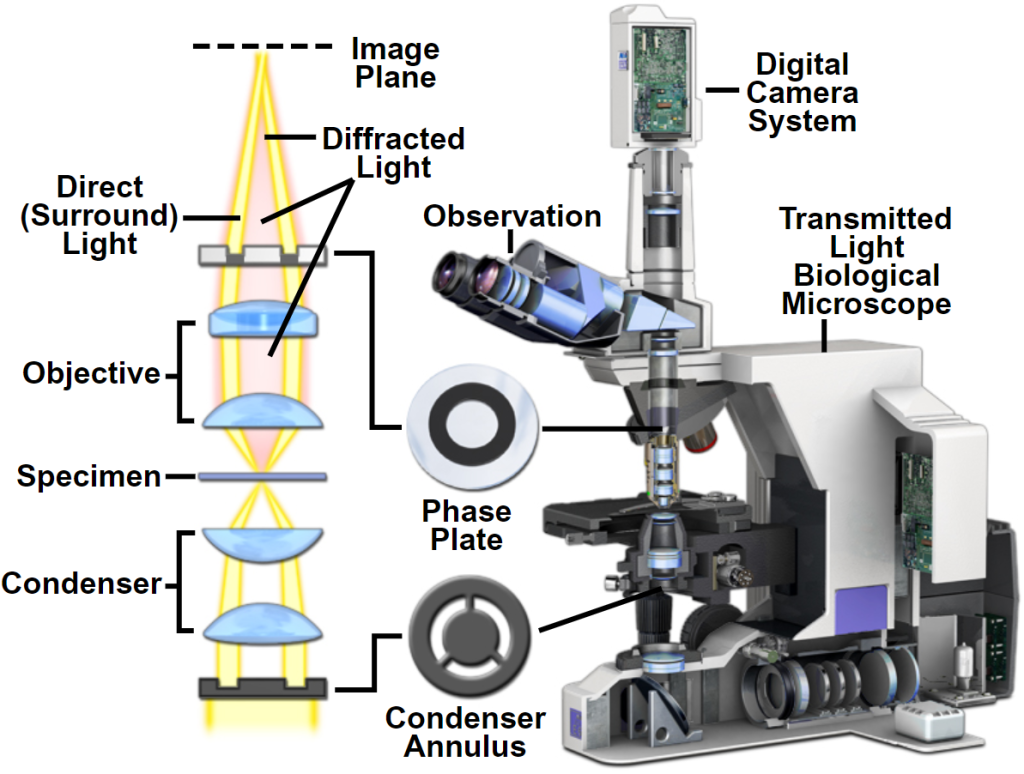
Phase contrast microscopy basically changes the optical path difference of visible light transmitted through the specimen into an amplitude difference, thereby improving the contrast between various structures and making various structures clearly visible. The light is refracted after passing through the specimen, deviates from the original optical path, and is delayed by 1/4λ (wavelength). If it increases or decreases by 1/4λ, the optical path difference becomes 1/2λ, and the two light beams interfere after they combine. Strengthen, increase or decrease the amplitude, and increase the contrast (see Figure 1-7).

From a structural point of view, the differences between phase contrast microscopes and ordinary optical microscopes are:
- The annular diaphragm has an annular opening and is installed between the light source and the condenser. Its function is to make the light passing through the condenser form a hollow light cone and focus it on the specimen.
- Phase plate phase contrast microscope adds a phase plate coated with magnesium fluoride inside the objective lens, which delays the phase of direct light or diffracted light by 1/4λ. There are two areas on the phase plate, the part through which direct light passes is called the “conjugate surface”, and the part through which diffracted light passes is called the “compensation surface”. Phase plates are divided into two types according to their working effects:
- A+ phase plate: Delay the direct light by 1/4λ. After the two groups of light waves are combined, the light waves are superimposed and the amplitude is increased. The specimen structure is brighter than the surrounding medium, forming a bright contrast (or negative contrast).
- B+ phase plate: Delay the diffracted light by 1/4λ. After the two sets of light rays are combined, the light waves subtract, the amplitude becomes smaller, and the specimen structure is darker than the surrounding medium, forming a dark contrast (or positive contrast). The objective lens with a phase plate is called a phase contrast objective lens, and is often marked with the word “Ph” on the objective lens housing.
On-axis adjustable telescope
The phase contrast microscope is equipped with an on-axis adjusting telescope (marked with the “CT” symbol on the housing), which is used to adjust the annular diaphragm so that the image is completely consistent with the conjugate surface of the phase plate, so as to achieve special processing of direct light and diffracted light. .
When using, remove one side of the eyepiece, insert the telescope to adjust the axis, adjust the axis to adjust the focus of the telescope, and there will be two rings in the field of view, namely the bright annular aperture ring and the darker conjugate on the phase plate. Face ring. Then turn the two adjusting screws of the annular diaphragm on the condenser so that the two rings completely overlap. If the bright halo is too small or too large, adjust the lift knob of the condenser so that the two rings match perfectly. If the condenser has been raised to the highest point or lowered to the lowest point and still cannot be corrected, it means that the glass slide is too thick and should be replaced. After adjustment, you can remove the on-axis adjustment telescope and replace it with the eyepiece.
green filter
Used to adjust the wavelength of the light source. Different wavelengths of illumination light will cause phase changes. In order to obtain good phase contrast effects, phase contrast microscopes require the use of monochromatic light with a narrow wavelength range, which is usually adjusted with a green filter.
The steps to use a phase contrast microscope are as follows:
- ① Select a suitable phase contrast objective lens according to the nature and requirements of the specimen to be inspected.
- ② Place the specimen slide on the stage and adjust the center of the optical axis.
- ③ Use the on-axis adjustment telescope, adjust the annular diaphragm and the conjugate surface ring on the phase plate to completely overlap, and then replace the eyepiece. During the observation process, every time the objective lens magnification is changed, the annular diaphragm must be re-adjusted to match the ring of the conjugate surface of the phase plate.
- ④ Add a green filter and observe according to the operating steps of an ordinary optical microscope.
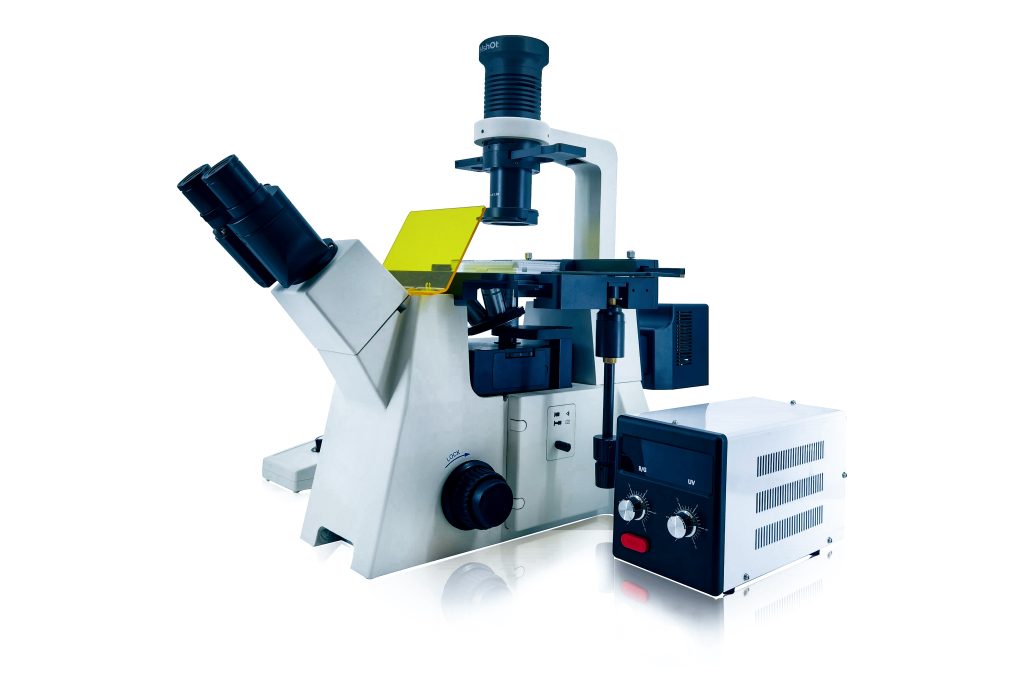
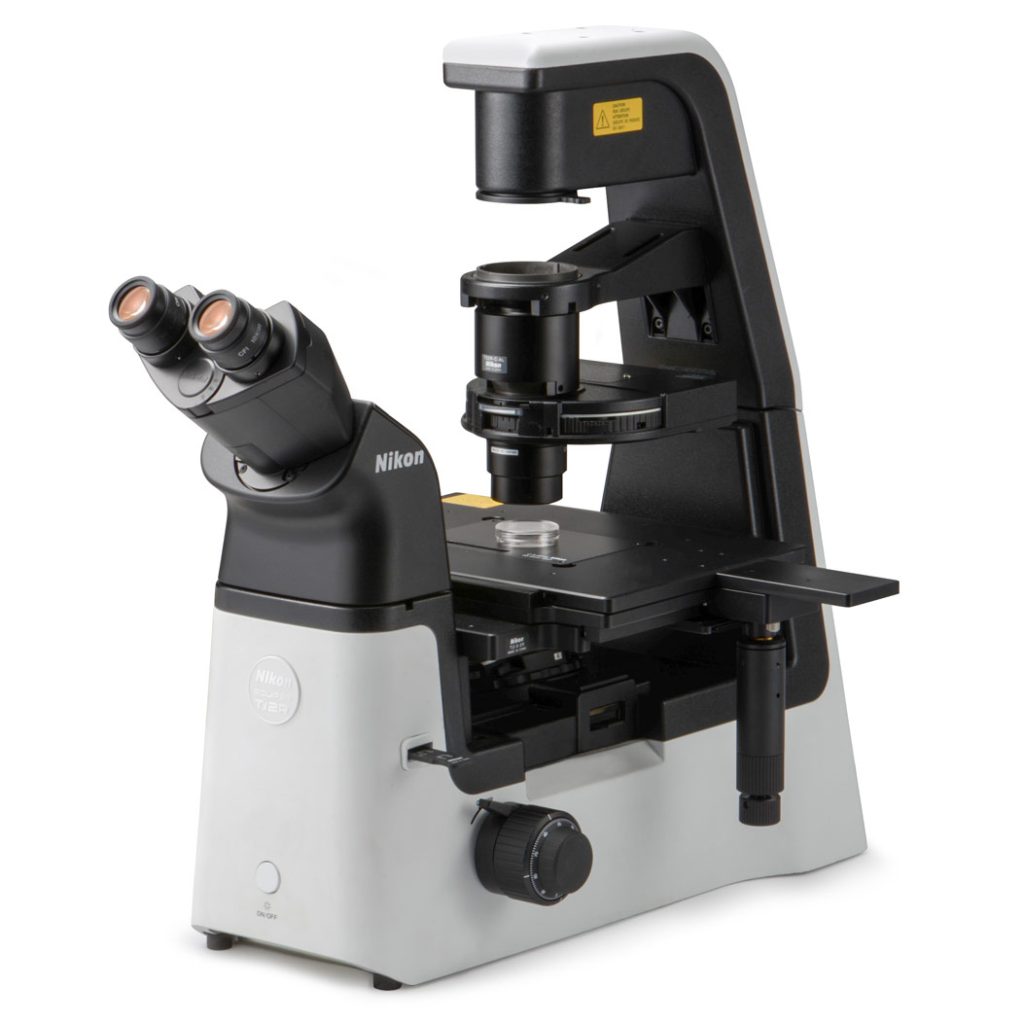
§5 Inverted microscope
The structure of an inverted microscope is basically the same as that of an ordinary microscope, except that the positions of the objective lens and the illumination system are exchanged. The former is under the stage and the latter is above the stage. Mainly used to observe cultured living cells, a phase contrast objective lens is required.
§6 Polarizing microscope
Polarizing microscope can be used to detect birefringent substances, such as chromosomes, collagen, fibers, etc. (Figure 1-9)
The difference from ordinary microscopes is:
- ① A polarizing microscope is equipped with a polarizer (polarizer) in front of the light source so that the light entering the microscope is polarized.
- ② There is an analyzer in the lens tube (analyzer, a polarizer with a polarization direction perpendicular to the polarizer).
- ③ Use a rotating stage. When a single refractive substance is placed on the stage, no matter how the stage is rotated, because the two polarizers are vertical, no light can be seen in the microscope. When a birefringent substance is placed, the light passes through this type of material. The object is deflected by the object, allowing the rotating stage to detect such objects.
- ④ Equipped with compensator or phase film;
- ⑤ Use special stress-free objective lenses.