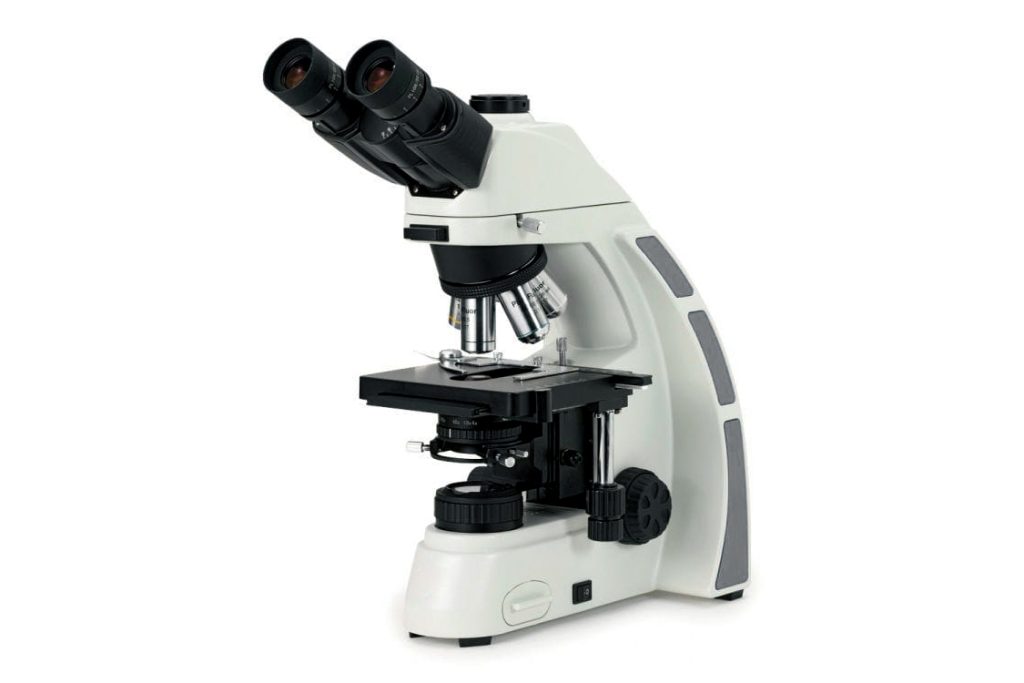
When almost everyone encounters a microscope for the first time, the instrument they see is the traditional, familiar brightfield microscope. The term “brightfield” refers to the way in which the object to be observed is illuminated. In brightfield microscopy, light passes through the specimen from a point below or below it, up through the objective lens, and finally reaches the instrument’s eyepiece. What one usually sees through the eyepiece of a brightfield microscope is a bright circle (or field of view) with the specimen located somewhere within that circular field of view.
But if you need to be able to observe unstained cells or microorganisms, you will be able to see little or no detail using brightfield illumination. Since the object you’re studying is transparent (or very close to it), you may only see a blurry outline.
One solution to such observation requirements is darkfield microscopy. The microscope itself does not have to be any different from that used in brightfield observation. The difference is how the specimen is illuminated. In a darkfield system, objects in the field of view are illuminated from the side, equivalent to a hollow cone of lighting that projects upward and outward from below the stage. As mentioned before, in a brightfield illumination arrangement, light typically passes through the sample from below. In darkfield illumination, light from directly below the viewing platform is blocked and/or redirected so that the only light falling on the field of view comes from all sides. What the viewer sees under this type of lighting is bright objects (illuminated obliquely from their surroundings) against a dark background.
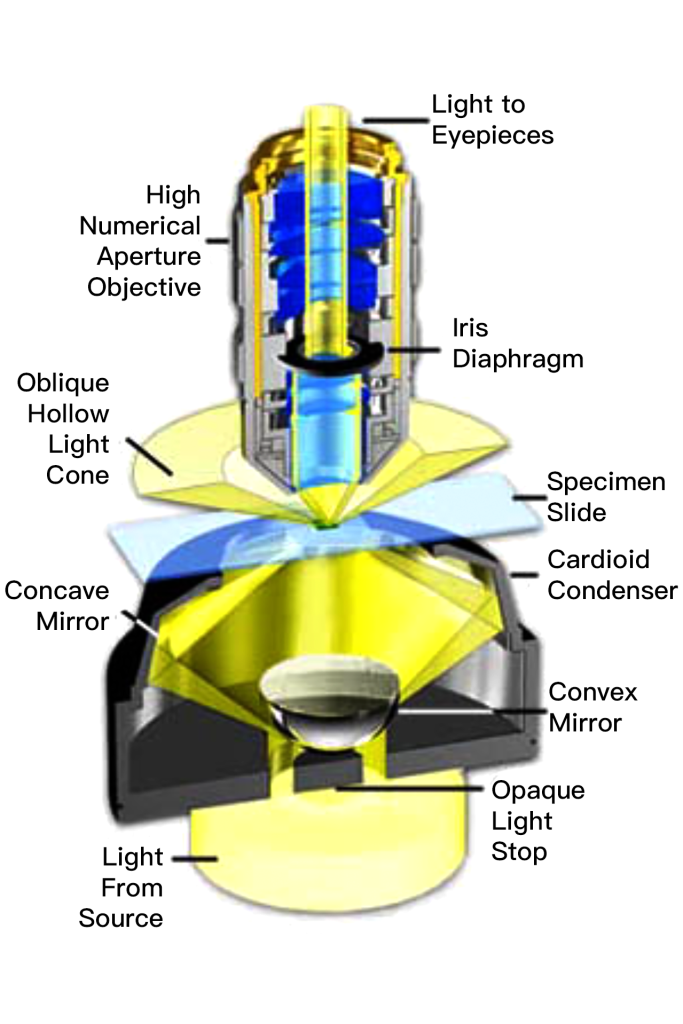
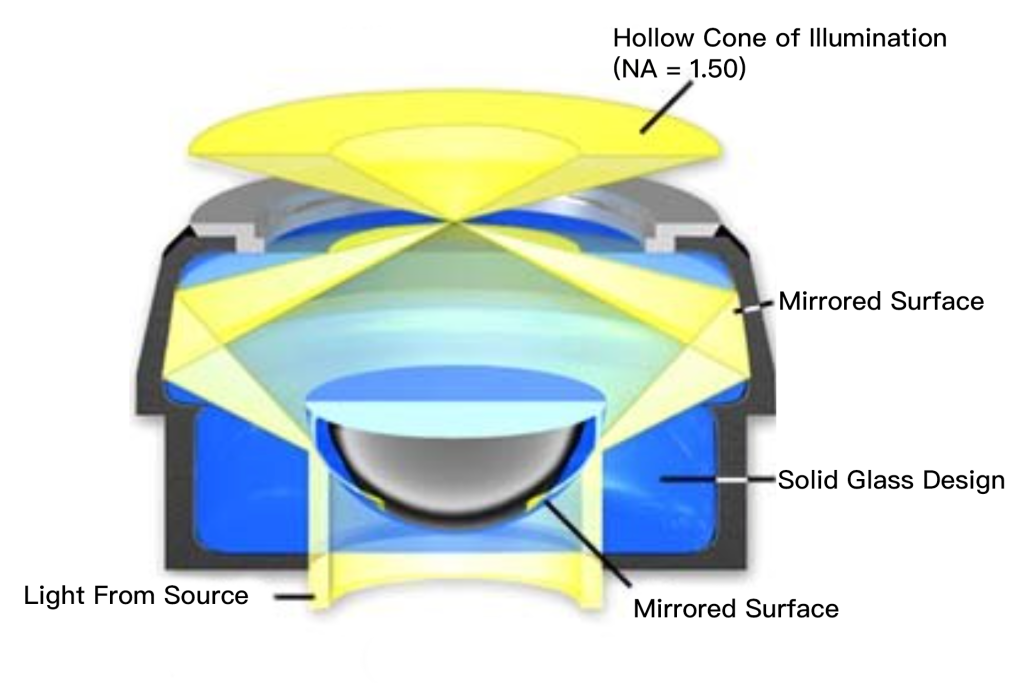
The cardioid condenser is a reflective darkfield design connected to an internal mirror that projects an aberration-free cone of light onto the sample plane.
What is darkfield microscopy?
Darkfield microscopy is a technique that uses oblique illumination to improve the contrast of specimens with poor imaging quality under conventional lighting conditions.
After the direct light is blocked by the opaque diaphragm in the condenser, the light passing through the sample from an oblique angle is diffracted, refracted and reflected into the microscope objective, forming a bright sample image superimposed on a dark background.
This dark background provides high contrast and easily makes specimens stand out even against a poor background. Here are some picture examples.
Ideal candidates for darkfield illumination include tiny living aquatic organisms, diatoms, small insects, bones, fibers, hair, unstained bacteria, yeast, cells in tissue culture, and protozoa. Abiotic samples include mineral and chemical crystals, colloidal particles, dust count samples, and polymer and ceramic flakes containing small inclusions, porosity differences, or refractive index gradients. Care should be taken when preparing specimens for darkfield microscopy because features located above and below the focal plane can also scatter light and cause degradation of image quality. Sample thickness and microscope slide thickness are also very important; in general, thinner samples eliminate diffraction artifacts that can interfere with image formation.
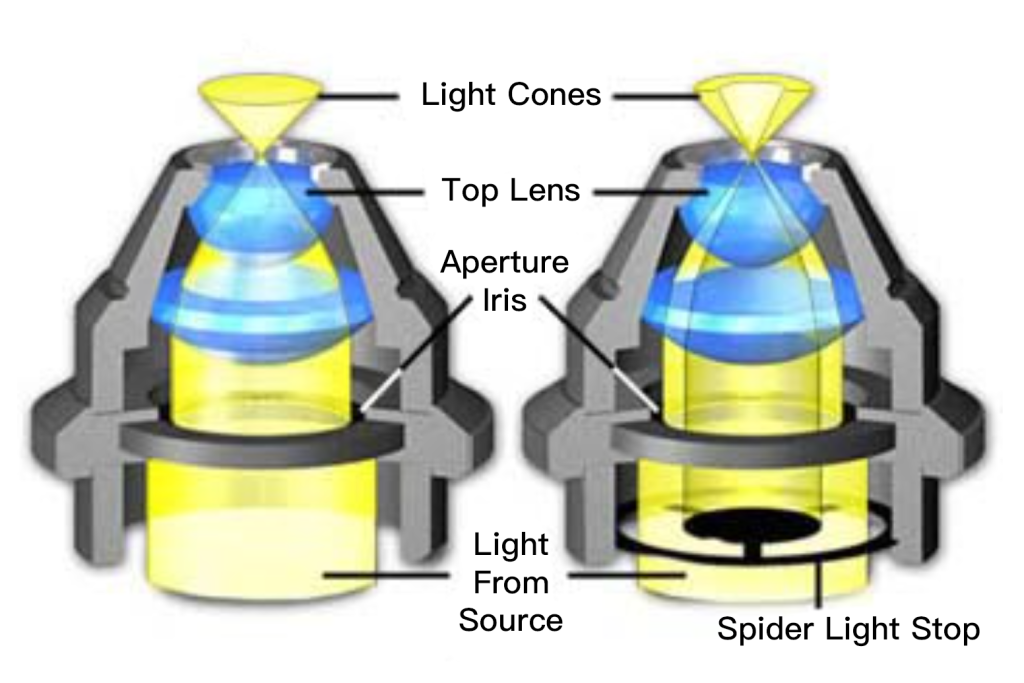
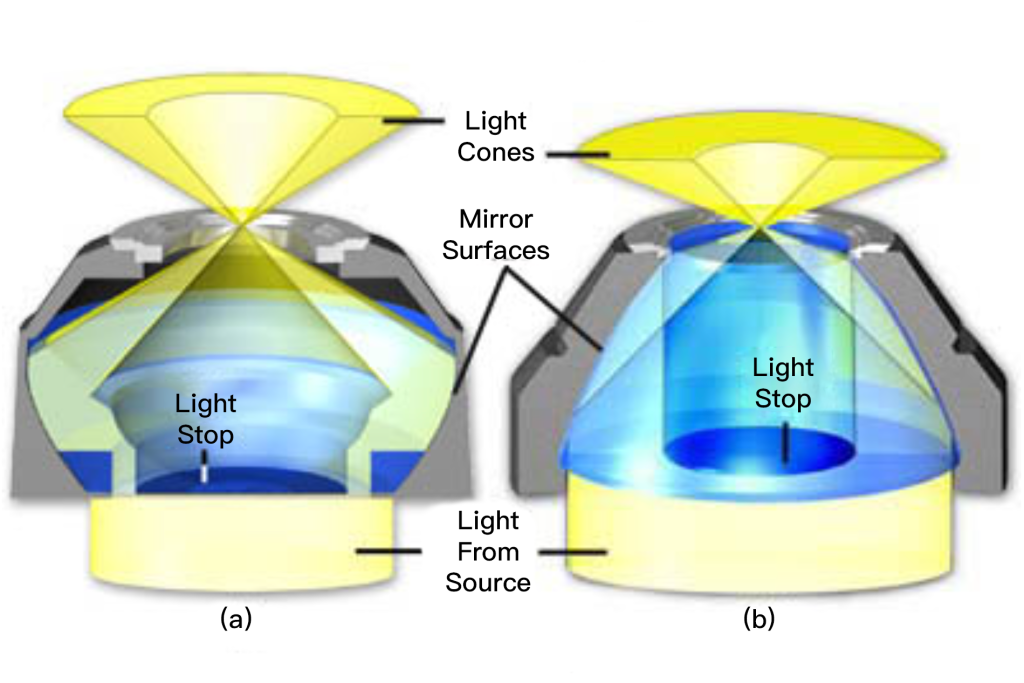
The substage condenser shown in Figure 2 illustrates the effect of an opaque diaphragm on the light path through a simple refractive condenser. On the left (Figure 2(a)) is a typical Abbe brightfield condenser with the aperture diaphragm open to maximize the numerical aperture of the light cone. Light from the source passes through the aperture stop and is refracted through several lens elements to form an inverted cone of light with a numerical aperture of approximately 1.20. When an opaque spider diaphragm (Figure 2(b)) is inserted below the fully open aperture diaphragm, the central ray is blocked and only peripheral rays are allowed to pass through the lens, forming an inverted inclined hollow light cone. The numerical aperture (1.20) does not change. . The illuminated hollow light cone is formed by the refraction of light at the periphery of the lens element, where optical correction is usually at its worst. Even so, this condenser works well when using low magnification objectives and produces very good results for qualitative darkfield work. For more precise quantitative microscopy, it is necessary to use an aspherical condenser (corrected for chromatic and spherical aberration), which produces images with sharper details and more reliable features, resulting in better performance.

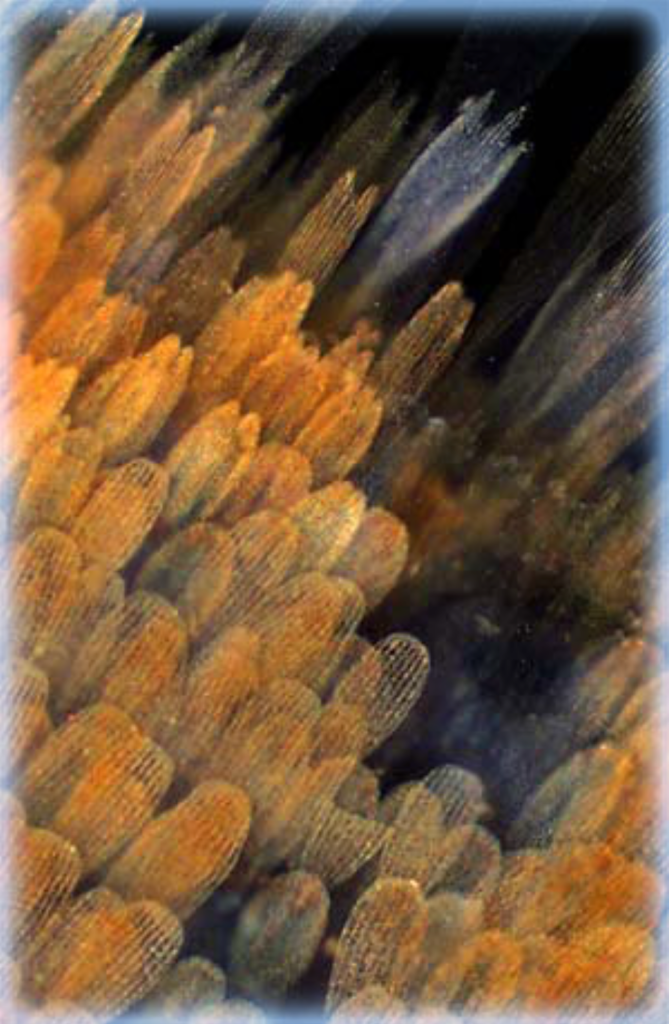
Figure 3
Right: The stomata and trachea of silkworm larvae. Fine splinters of wood take on an unusually beautiful appearance when illuminated under darkfield conditions using a transmitted light microscope.
Left: Butterfly. Because members of this order have such a wide range of wing scale types, butterflies are some of the most colorful members of the insect world. Digital images reveal the numerous tiny scales that adorn much of the surface of a butterfly wing. The scales on the wings were illuminated with a darkfield condenser located beneath the stage, and images were captured at low magnification (50x).
How darkfield microscopy works
Darkfield illumination requires blocking most of the light that would normally pass through and around the sample, allowing only oblique light to hit the sample.
The top lens of the simple Abbe darkfield condenser is spherically concave, which allows the light emitted from the top lens surface to form an inverted hollow cone and focus on the sample plane. Where there is no sample and the condenser numerical aperture is larger than the objective, the oblique rays will cross each other and stagger the objective, darkening these areas.
When a specimen (especially one that is unstained and does not absorb light) is placed on a slide, oblique light rays interact with the specimen and are diffracted, reflected, and/or reflected by elements within the specimen such as cell membranes, nuclei, and internal organelles. or refraction. These weak lights will enter the objective lens. The end result is a bright specimen image on a black background.
What components are needed for darkfield microscopy?
Almost any brightfield laboratory microscope can be easily converted for darkfield illumination. The easiest way is to switch your existing condenser to one designed for darkfield illumination (Figure 4).
This type of condenser is relatively simple and has the high numerical aperture (NA) required to produce a darkfield illumination cone. However, for everyday microscopy use, it is impractical to switch the condenser depending on the type of illumination. Fortunately, there are no solutions.
Many condensers can be fitted with inserts that create a cone of illumination. These add-ons do not offer the same high numerical apertures as dedicated darkfield condensers and therefore may not be used with all objectives. But plug-ins give you the flexibility to use multiple viewing methods on the same condenser.
Using a darkfield illumination condenser
High magnification dark field microscope
For more precise work and a darker background, you can choose a condenser designed for darkfield, which transmits only oblique light. There are several types: “dry” darkfield condensers, which have air between the top of the condenser and the underside of the slide, and immersion darkfield condensers, which require the use of a drop of immersion oil (some designs use water instead) at the top of the condenser and Contact between the undersides of the slides. Immersion darkfield condensers have internal mirrors that pass light at steep angles without chromatic aberration, producing optimal results and the darkest backgrounds.
Perhaps the most widely used darkfield condenser is the parabolic condenser, which consists of a solid piece of glass ground very precisely into the shape of a paraboloid, as shown in Figure 5(b). Light incident on the reflective surface of a parabolic concentrator (between the glass and the concentrator housing in Figure 5(b)) will be focused at the focal point of the reflector. Most parabolic condensers are cut to ensure that the focus point is slightly beyond the top of the condenser so that parallel light rays will be focused where they maximize illumination of the sample. A light baffle at the bottom of the glass condenser blocks central light from reaching the sample. Light rays reflected by the condenser have an angle above the critical angle of reflection and converge at the principal focus of the condenser.
As mentioned above, dry darkfield condensers are suitable for objectives with numerical apertures below 0.75 (Figure 5(a)), while parabolic and cardioid immersion condensers (Figures 1 and 5(b)) can be used for objectives with very high numerical apertures . Aperture (max 1.4). Objectives with numerical apertures higher than 1.2 need to have their working apertures slightly reduced because their maximum numerical aperture may exceed the numerical aperture of the condenser, allowing direct light to enter the objective. Therefore, many high numerical aperture lenses designed for darkfield and brightfield illumination have a built-in adjustable iris that acts as an aperture stop. Reducing the numerical aperture also limits the resolution of the objective and the intensity of light in the image. The maximum numerical aperture of specialized objectives designed for darkfield work is close to the lower numerical aperture limit of darkfield condensers. They do not have an internal variable aperture, but the lens mounting diameter is adjusted so that at least one of the internal lenses has the optimal diameter as the aperture stop.
Why is darkfield microscopy a good imaging technique?
Typically, objects viewed under imaging suitable for darkfield illumination look stunning. Specimens that inherently have very low contrast in brightfield microscopy tend to be very dazzling when viewed in darkfield.
Darkfield illumination is particularly suitable for showing contours, edges, boundaries and refractive index gradients. Ideal candidates for darkfield illumination include tiny aquatic organisms, diatoms, small insects, bones, fibers, hair, unstained bacteria, yeast, tissue culture cells, and protozoa.
Non-biological specimens suitable for darkfield observation include mineral and chemical crystals, colloidal particles, dust count specimens, and polymer and ceramic flakes containing small inclusions, porosity differences, or refractive index gradients.
Here are some examples of specimens captured using darkfield imaging:
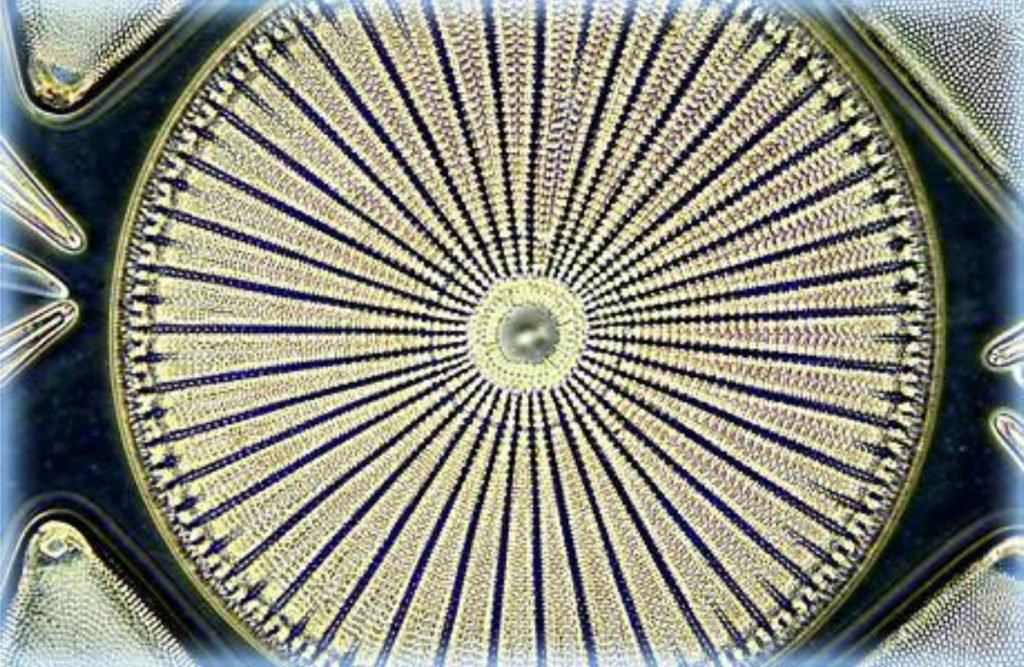


Left: This gorgeous darkfield microscopy image of the diatom Arachnida was taken by Mortimer Abramowitz using an Olympus microscope. The sample was illuminated with a high numerical aperture darkfield condenser and between the microscope slide and the objective and condenser top lenses. Place the immersion oil.
Center: Basswood. Stained specimens often make excellent subjects for darkfield microscopy, producing images with brilliant colors on dark backgrounds. This photomicrograph shows a stained thin section of basswood under darkfield illumination.
Right: LCD DNA. This highly concentrated DNA solution undergoes a series of liquid crystal phase transitions to form a tightly packed hexagonal phase. This photomicrograph was taken using a compound optical microscope with a 10x objective under darkfield illumination.
Darkfield illumination is not particularly advantageous for showing interior details. If you want to get the most out of darkfield lighting, there are other conditions to consider.
What are the challenges of using darkfield microscopy?
Special care must be taken when preparing specimens for darkfield microscopy because features located above and below the focal plane can scatter light and cause image degradation. The cleanliness of the slide is an important factor that affects imaging. In darkfield illumination, it is even more important because even small debris will be illuminated and prevent you from seeing the part you want to observe.
Other issues you may face when setting up a microscope for darkfield observation include:
- The lighting is not sufficient to allow observation of the specimen or the specimen can be observed but the light is very weak.
Darkfield microscopy requires a large amount of light for correct imaging because a lot of light is blocked and forms a cone shape. Therefore, the lighting power needs to be increased, but it should be noted that some samples may not be able to withstand a large amount of light for a long time.
- The slide has a dark spot in the center of the field of view, but the objects observed in the periphery are well-illuminated and look normal.
This is usually caused by the condenser not being properly aligned or focused. Centering and focusing the condenser solves this problem. This solution works for most situations where the illumination looks uneven but the sample is clearly visible.
- There is color in the background, or the background is not uniform due to grayscale.
This is usually caused by the sample being too thick or the sample being installed in contaminated media. Reinstalling the sample should resolve the issue.
What are the advantages of darkfield microscopy?
Darkfield microscopy has many advantages.
- Dark background can provide high contrast, making it easy to observe specimens even on poor backgrounds.
- Since many brightfield laboratory microscopes can be configured for darkfield illumination, this technology is easy to acquire.
- When the sample is elegantly illuminated, the darkfield image can look more like a work of art.