History
Optics is one of the oldest branches of science, and the word ‘optics’ originates from the Latin word ‘ta optika meaning “appearance” or “appearance”. In 300 BC, Euclid wrote one of the earliest known works on optics, in which he described his theory of the geometry of vision.
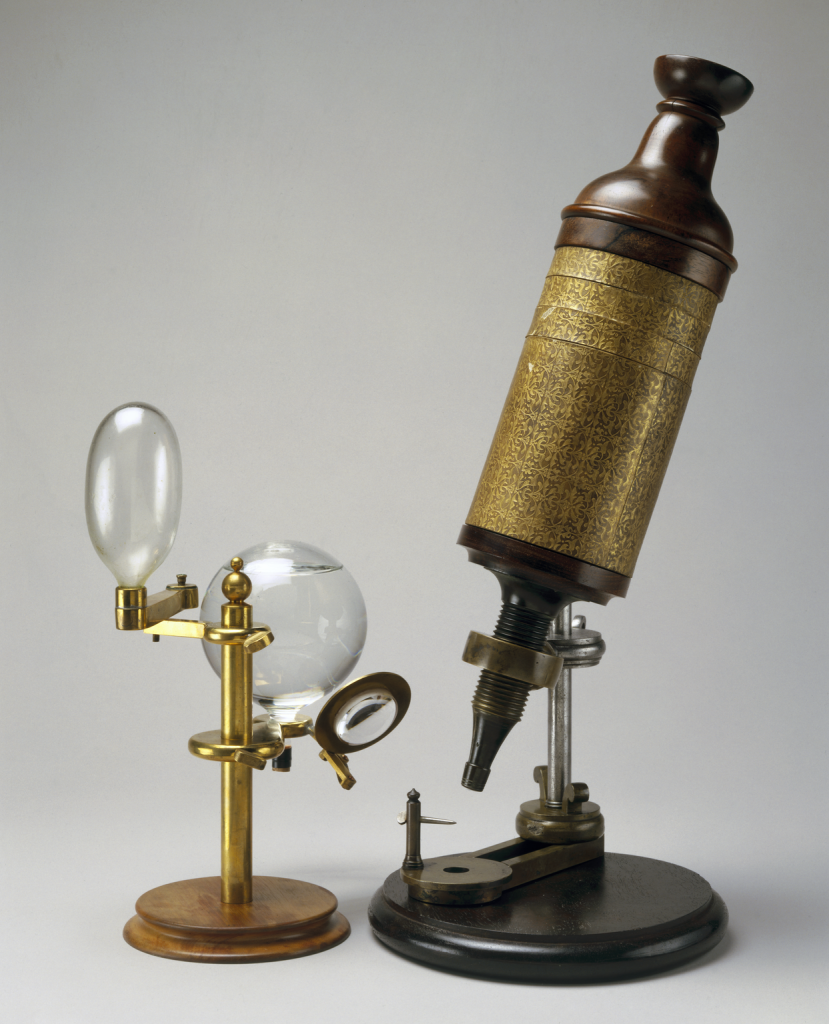
The invention of the first microscope is attributed to Hans and Zacharias Janssen at the end of the 16th century. Janssen is a Dutch father and son who worked as optician. They discovered that when several lenses were arranged in a tube, they could see a much larger image than a magnifying glass, the first compound microscope.
Lens
Abstract: In this chapter, we will look at the characteristics of lenses and some of the key properties most relevant to microscopy. Of course, optical technology goes much deeper than what’s described here.
Lens shape and function
An important characteristic of a lens is its ability to collect and transmit light. In a microscope, light is information, and we want the microscope to capture as much light as possible. A high-quality lens has a greater ability to focus light, so less optical information is lost within the system.
Lenses are classified by their shape, with the two main shapes being convex lenses and concave lenses.
- Convex lens
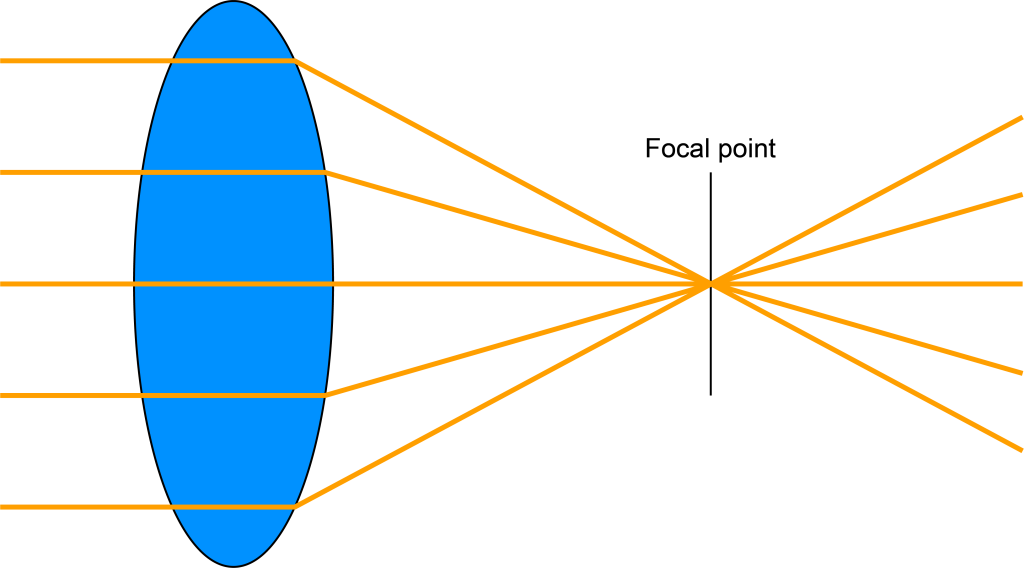
Convex lenses bring light together and focus the image
- Concave lens
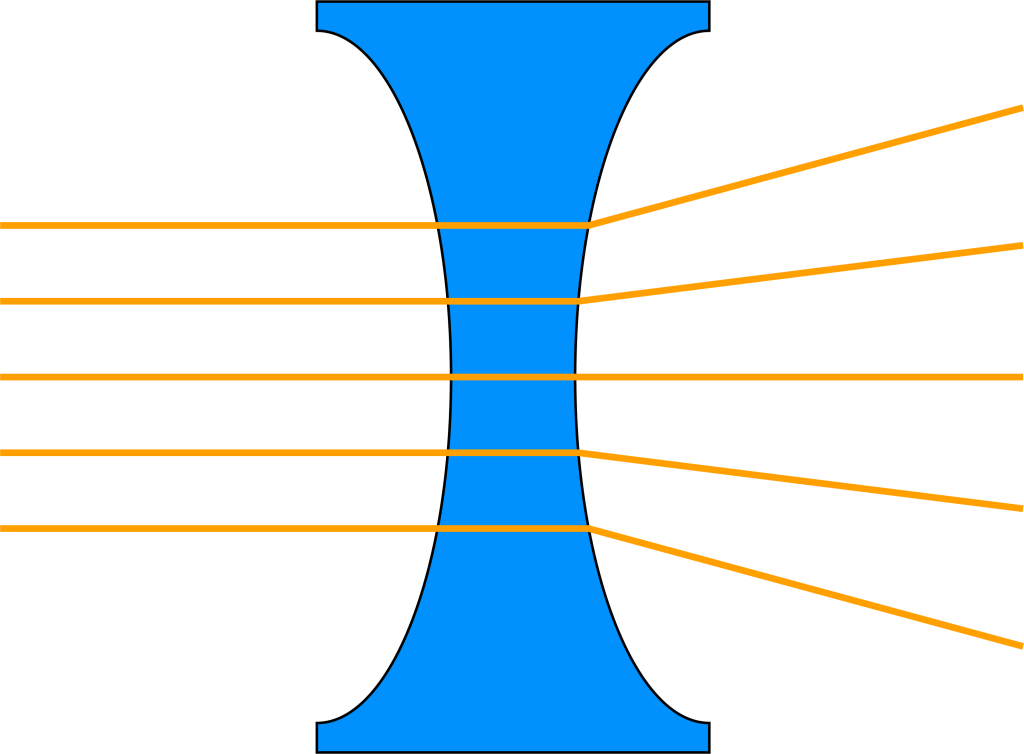
Concave lenses bend light outward and magnify the image
lens coating
Many lenses have special coatings to improve the optical quality of the lens. These coatings are only a few microns (μm) thick and are used to fine-tune the optical properties of the lens. It can be identified by the color of the lens surface when viewed from a specific angle. Because the lens coating is so thin, extra care needs to be taken when cleaning. Special coatings can also increase the price of an objective, so it’s important to take care of them.
Anti-reflective coating
When light encounters a medium such as glass, some of the light is refracted through the glass (transmission) and some is reflected out.
- Anti-reflective coatings are used to reduce the amount of light reflected by the lens and increase the amount of light passing through the glass.
- Anti-reflective coatings increase the efficiency of light sources by helping more light pass through the lens.
·
Prism
Prisms are widely used in microscopes to redirect or split light. Prisms are available in different types and classified according to their shape and function. Dispersive prisms are used to separate different colors of light.

A prism is a geometrically shaped crystal or glass
- Lenses focus and magnify light, while prisms redirect and split light without changing the focus and magnification of light.
- A prism has at least five flat sides and no curved sides, whereas a lens will have curved sides.
Resolution
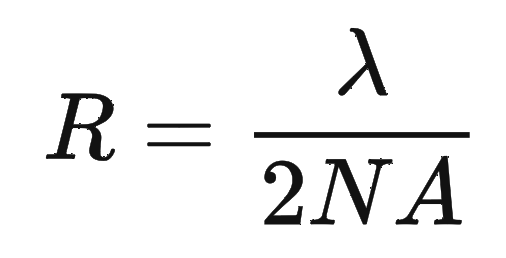
Resolution in microscopy refers to the minimum distance between two resolvable objects. The higher the resolution of a microscope, the better its ability to separate small objects and see fine details. There is a direct relationship between the wavelength (λ) of the light used for imaging and the resolution (R): the smaller the wavelength, the higher the resolution.
Objective lens
Abstract: The objective is one of the most expensive and influential parts of a microscope. In this chapter, we will introduce in detail the different parameters of the objective lens and their meaning. This will enable you to choose the correct objective and help you get the best from your equipment. We will also cover how to use an oil lens.
Objective lens parameters
- Achromatic and fully achromatic
When white light passes through a lens, different degrees of refraction occur due to different refractive indexes of light of different colors. This will cause light of different colors to fail to converge to the same focal point, resulting in chromatic aberration. Images with chromatic aberration usually have the following two characteristics:
- The image is slightly out of focus,
- Other colors (usually red and blue) appear at the edge of the sample or field of view.
Achromats correct this phenomenon, ensuring that all colors of light converge on the lens at the same focal point. The abbreviation “achro” is used on the objective lens to indicate achromat, and “apo” is used to indicate apochromat.
ach lens: corrects chromatic aberration for blue light (486nm) and red light (656nm), and corrects spherical aberration for light with a wavelength of 546nm. Achromatic lenses are the best choice for monochromatic light applications.
apo lens: required to be able to correct chromatic aberration in three wavelength regions (red, blue and yellow). In addition, they can also provide spherical aberration correction for two to three wavelengths, and usually have higher numerical apertures and longer working distances. Therefore, the optical structure is more complex, and they usually need to be made of materials such as special glass or fluorite. . Apochromatic objectives are ideal for use in white light applications.
- Finite & Infinity Optical Systems
Infinite conjugation and finite conjugation refer to the two conjugate surfaces of the object surface and the image surface of the microscope objective. As shown in Figure A below, for a finite-far conjugate microscope objective, the light scattered from the sample is converged to a point by the objective lens, and then imaged through the eyepiece; while for an infinite-far conjugate microscope objective, as shown in Figure b, the aperture after leaving the objective lens is The light is collimated, and in imaging applications a tube lens is needed to focus the collimated light from the objective onto the sensor. The housing of the infinity conjugate microscope objective lens is marked with the word “∞“.
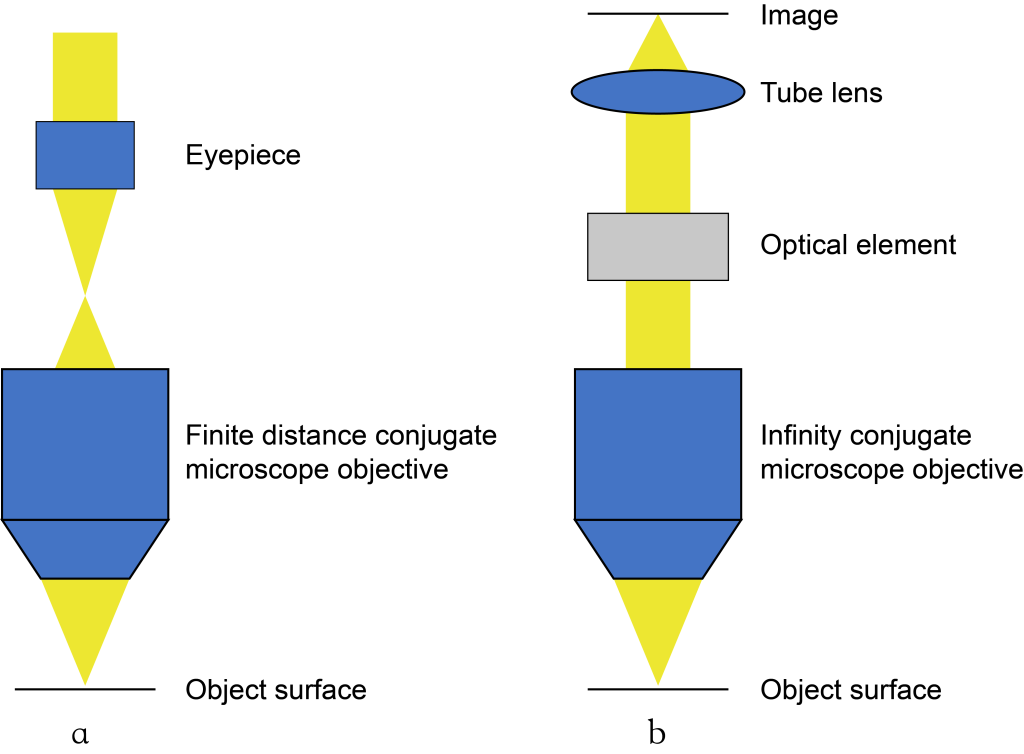
a Finite distance conjugate objective lens b Infinity conjugate objective lens
Magnification
The magnification is indicated by a number and the letter “×” on the objective lens. For example, 10×(or×10) means that the objective lens magnifies the sample 10 times. See 5.7 for a complete explanation.
- Numerical Aperture (NA)
The numerical aperture of an objective lens is labeled NA and a value. For optimal resolution, the NA of the target must match the NA of the condenser. See 5.8 for the detailed explanation.
- Plane objective
To change the direction of light propagation, the lenses in the objective are curved. While this curvature is the essence of a lens’ ability to magnify and focus an image, it is also the reason why images appear vignetted. Light passing through the center of the lens is not refracted very strongly, and light passing through the edge of the lens is strongly refracted. All lenses experience some degree of haloing, and most microscopes are designed in such a way that haloed areas are outside the field of view.
Plane lenses are represented by the code “plan” on the objective. The higher the “plan %”, the larger the flat area and the less Vignetting the user will see. In many imaging systems, the eyepiece has a slightly lower FOV than the objective. By hiding the edges of the objective FOV, any blur around the edges of the image will be hidden.
- Refractive Index (RI)
When using an oil lens for imaging, the user needs to use immersion lens oil, and the refractive index of the oil must match the refractive index of the objective lens. The refractive index is recorded on the objective lens as “RI” and a numerical value. The RI value of glass is about 1.3; the RI value of oil can reach about 1.5. When purchasing immersion oil for imaging, what is important is not the brand but the RI value (the RI of the oil should match the RI of the oil objective). See 4.5 for a complete explanation.
- working distance
Working Distance (WD) is defined as the distance between the objective lens and the sample. When working at higher magnifications, the objective lens will be very close to the slide. If the user is not careful when adjusting, the objective lens may hit the glass.
The higher the magnification, the lower the WD value.

- Air objective
Air objectives are the most common standard objectives. Light passes through the sample (the propagation medium is air). Air objectives achieve low to moderate levels of magnification due to the scattering of light through air.

Light travels through the sample, through the air, and into the objective lens
- Oil lens
Oil lenses are used for high-magnification imaging. By adding immersion oil, we prevent the scattering of light and essentially use the oil to focus the light into the objective lens. The most common oil lens imaging magnifications are ×60 and ×100.
- How to use oil lens
For oil lens imaging, lower magnifications are usually around ×60 and then go up to ×100. Samples are usually first inspected with a low-magnification air objective to ensure sample quality. Under high magnification, defective samples are more obvious.
Note: If the microscope has a combination of air and oil objectives, be very careful about what type of objective you choose. Without oil, the oil lens will not work. Immersion oil will damage the air objective if used with it.
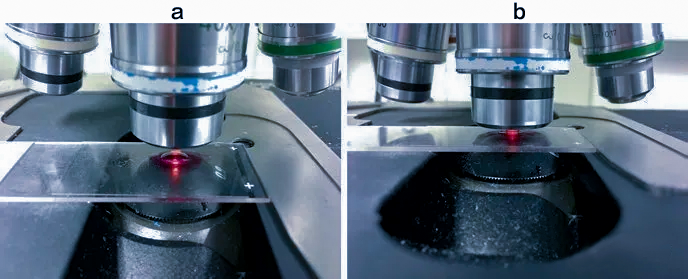
The oil drop must be approached slowly. Once the objective lens is in contact with the oil, imaging is ready to begin
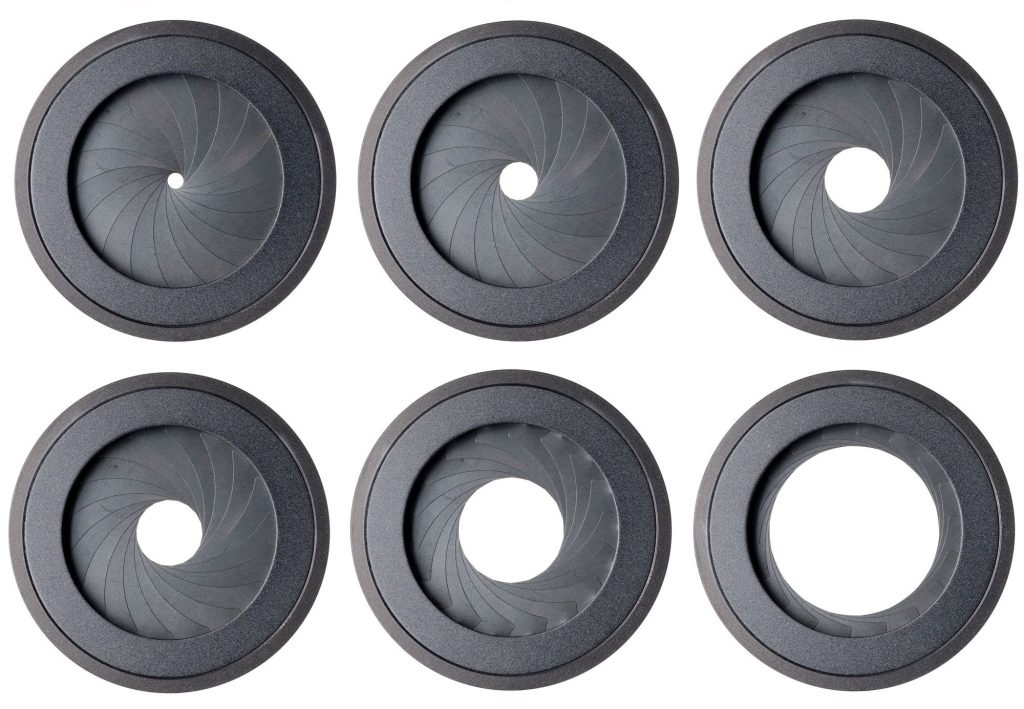
Aperture
Diaphragm is used to control the amount of light entering. The Iris Diaphragm is a more advanced and now more common diaphragm type. It is a ring containing a set of overlapping leaves that slide against each other to open and close the aperture, and are controlled by a small lever that the user can adjust manually.
- Choose the right technology
Z-Stacking
Z-Stacking is a technique that captures images of a sample while moving up or down a vertical axis and can be applied to many different microscopy techniques. The technology can create pseudo-3D images of cells or tissues and can be used to collect depth and distribution information in the sample. For example, the arrangement of cells within a tissue, or the arrangement of mitochondria within a cell.
Z-Stacking can be done manually or using automation, both methods involve imaging the sample in the Z-axis. The method of Z-Stacking is to focus the objective lens on the top of the sample, capture one image, then move a few microns along the Z-axis to capture another image, move down through the Z-axis, and continue this method until you reach the bottom of the sample . These images are then merged to create a composite image.
Z-Stacking can be performed on most well-prepared fixed samples. While it can be done on live cell samples, the individual layers of z-Stacking will not align properly if the sample drifts during imaging.