Metallographic microscope is an important optical instrument for analyzing the metallographic structure of metal materials. Metallography mainly refers to the branch of material science that analyzes and characterizes the microstructure, low-magnification structure and fracture structure of materials with the help of optical (metallographic) microscopes and stereo microscopes. It includes both the imaging of material microstructure and its qualitative, Quantitative characterization, also covering necessary sample preparation, preparation and sampling methods. It mainly reflects and characterizes the phase and tissue composition, grains (including possible subgrains), non-metallic inclusions and even the quantity, shape, size, distribution, and Orientation, spatial arrangement, etc. The following is a brief discussion on the use of metallographic microscope and the preparation of metallographic samples.
1. The structure of the metallographic microscope

The structure of an optical metallographic microscope generally includes three parts: the magnification system, the optical path system and the mechanical system, among which the magnification system is the key part of the microscope. At present, it is mainly a computer-type metallographic microscope, which is a high-tech product developed by perfectly combining optical microscope technology, photoelectric conversion technology, and computer image processing technology. It can easily observe metallographic images on a computer. Analyze and grade metallographic maps, and output and print pictures.
2. Matters needing attention when using a microscope
1) The operator’s hands must be washed and dried, and the environment should be kept clean, and the environment should be kept clean and dry;
2) When using a low-voltage tungsten filament bulb as a light source, the power supply must pass through a transformer, and must not be connected to the 220V power supply by mistake;
3) Be extra careful when replacing the objective lens and eyepiece, and be careful not to drop it by accident;
4) When adjusting the axial distance between the object and the front lens of the objective lens (hereinafter referred to as focusing), the relationship between the direction of the coarse adjustment knob and the lifting direction of the stage must first be clarified. The objective lens should be adjusted as close as possible to the object with the coarse adjustment knob first, but must not touch it. Then carefully observe the brightness in the field of view and at the same time use the coarse adjustment knob to slowly adjust the objective lens away from the object. When the field of view suddenly becomes brighter or even has an image, use the fine-tuning knob to adjust until the image is clearest.
5) When using an oil-based objective lens, the amount of oil dripping should not be too much, and it must be washed and dried with xylene immediately after use;
6) The sample to be observed must be completely dried, and the sample etched with hydrofluoric acid takes longer to dry, because hydrofluoric acid has a serious corrosion effect on the lens.
3. Metallographic sample preparation
The metallographic sample preparation process generally includes five steps: sampling, rough grinding, fine grinding, polishing and etching.
1) Sampling
Taking samples from metal materials and parts to be tested is called “sampling”. The sampling site and the selection of the grinding surface must be determined according to the analysis requirements. There are many cutting methods. For soft materials, sawing, turning, and planing can be used; for hard materials, cutting methods such as grinding wheel slicer or wire cutting machine can be used; for hard and brittle materials, hammering can be used.
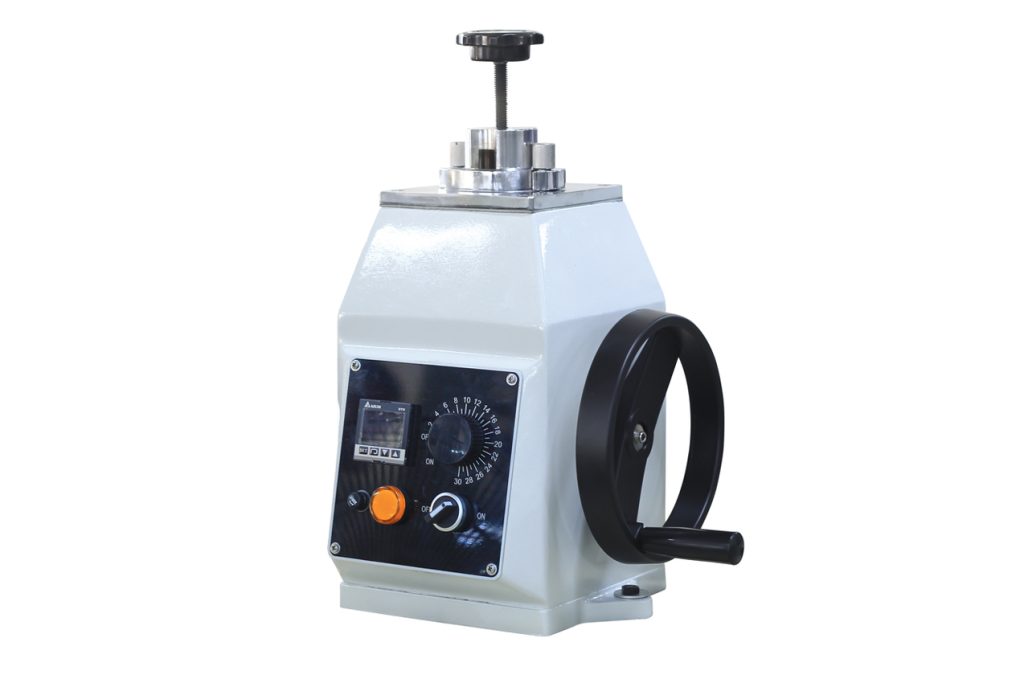
No matter which method is used, attention should be paid to avoid and reduce tissue distortion caused by plastic deformation or heat as much as possible. There is no uniform regulation on the size of the sample. From the perspective of easy holding and grinding, the general diameter or side length is 15~20mm, and the height is 12~18mm. For those samples that are too small in size, irregular in shape and need to protect the edges, mosaic or mechanical clamping methods can be adopted.
The inlay of metallographic samples is carried out by using thermoplastics (such as polyvinyl chloride), thermosetting plastics (such as bakelite powder) and condensation plastics (such as epoxy resin + curing agent) as fillers. The first two types belong to hot-mounting fillers, and hot-mounting must be carried out on a special equipment, a mounting machine. The third type belongs to cold mounting filler.
2) Coarse grinding
The purpose of coarse grinding is mainly the following three points:
Trimming Some samples, such as those knocked out by hammering, have very irregular shapes and must be roughly ground to trim them into regular-shaped samples;
Grinding No matter what method is used to sample, the incision is often not very smooth. In order to smooth the observation surface and remove the deformation layer produced during cutting, rough grinding must be carried out;
Chamfering On the premise that it does not affect the observation purpose, the corners on the specimen should be ground to avoid scratching the sandpaper and polishing fabric.
3) fine grinding
After rough grinding, there are still coarse and deep wear marks on the grinding surface, and fine grinding must be carried out in order to eliminate these wear marks. Fine grinding can be divided into manual grinding and mechanical grinding. At present, mechanical grinding is the main grinding method.
The most commonly used mechanical grinding equipment is the pre-grinding machine. The motor drives the disc covered with water sandpaper to rotate. When grinding, the sample is moved back and forth along the radial direction of the disc. The force should be uniform, and the water is washed while grinding. The water flow not only plays the role of cooling the sample, but also continuously rushes the shedding sand, abrasive debris, etc. to the edge of the turntable by means of centrifugal force.
The grinding speed of mechanical grinding is much faster than that of manual grinding, but the flatness is not good enough, and the surface deformation layer is also serious. Therefore, samples with higher requirements or softer materials should be ground by hand.
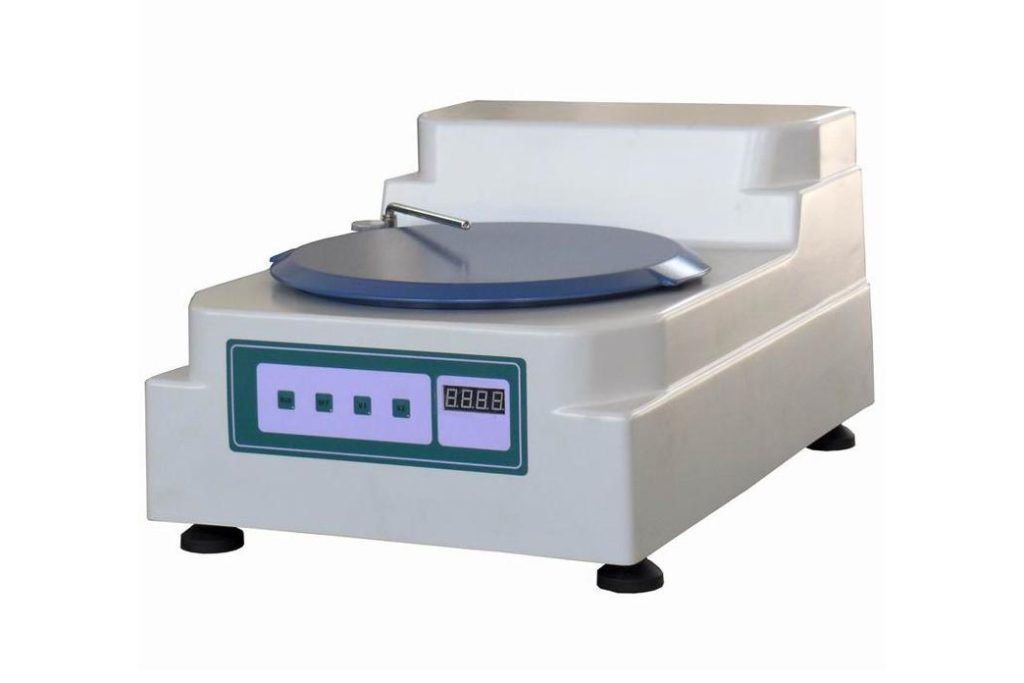
4) Polishing
The purpose of polishing is to remove the fine grinding marks left on the grinding surface after fine grinding, and obtain a bright and traceless mirror surface. Polishing methods include mechanical polishing, electrolytic polishing and chemical polishing, among which mechanical polishing is the most commonly used.
Mechanical polishing is carried out on a polishing machine. The polishing fabric (canvas is commonly used for rough polishing, woolen is commonly used for fine polishing) is wetted with water, flattened, stretched and fixed on the polishing disc.
Turn on the switch to make the polishing disc rotate counterclockwise, sprinkle an appropriate amount of polishing liquid (suspension of aluminum oxide, chromium oxide or iron oxide polishing powder plus water) on the disc to perform polishing. When polishing, pay attention to:
The sample moves back and forth slowly along the radial direction of the disk, and at the same time, the polishing disk turns to rotate in reverse, and when the polishing is about to end, it is positioned and lightly polished for a short time.
During the polishing process, a proper amount of polishing liquid or water should be added frequently to maintain the humidity of the polishing disc. If the polishing disc is found to be too dirty or has coarse particles, it must be rinsed off before further use.
The polishing time should be shortened as much as possible and not too long. In order to meet this requirement, it can be divided into two steps: rough polishing and fine polishing.
When polishing non-ferrous metals (such as copper, aluminum and their alloys, etc.), it is best to apply a little soap or drop an appropriate amount of soapy water on the polishing disc.
5) Erosion
When the polished sample is observed under a metallographic microscope, only the bright grinding surface can be seen. If there are scratches, water marks, or non-metallic inclusions, graphite, and cracks in the material, it can also be seen, but it is necessary to analyze the gold The phase structure must also be etched.
There are many etching methods, the most commonly used is the chemical etching method, which uses the chemical dissolution and electrochemical etching of the etchant to expose the tissue.
The etching of pure metal (or single-phase homogeneous solid solution) is basically a chemical dissolution process. Compared with the atoms inside the grain, the atoms at the grain boundary have higher free energy and poorer stability, so they are easily corroded to form grooves. The interior of the grains is etched to a lesser extent, and the original polishing plane is generally maintained. Observed under bright field, it can be seen that individual grains are separated by grain boundaries (black network). If the etching is deep, it can also be found that the brightness and darkness of each grain are different. This is because the atomic arrangement of each grain is different, and after etching, the degree of inclination between the exposed surface, which is dominated by the closest-packed surface, and the original polished surface is different.
Qualified samples after inspection can be placed in the etchant with the polished side facing up, and the change of surface color can be observed continuously. This is the etching method. You can also gently wipe the polished surface with cotton stained with etchant to observe the change of surface color. This is the erosion method. Take it out immediately when the surface of the sample is etched to a little gray, rinse it with running water, drop some alcohol on the etched surface, then use filter paper to absorb excess water and alcohol, and quickly dry it with a hair dryer to complete the entire preparation sample process.